Previous versions of Windows haven’t had a way of putting a password on a folder you don’t want other people to access. Even creating guest user account on the computer wasn’t a fault proof way of protecting your private folders from unwanted access.
Third parties have been coming through for most users in previous Windows versions and editions. But what’s not to love about Windows 10. There’s an easy trick to lock folders with passwords using the Folder lock utility in windows 10.
Although the process is not straight forward in the GUI, follow these simple steps and you’ll be able to do it.
Password Protect Folder using Folder Lock:
Get all the files you want to protect into a folder. The folder can be placed anywhere; including your desktop.
Open the folder ad right click anywhere inside. Select New –> Text Document. You can leave it with the default name. (It’s a notepad document)
Open the document. Copy this text and paste it in the text document. Select all, copy, then paste it in the text document.
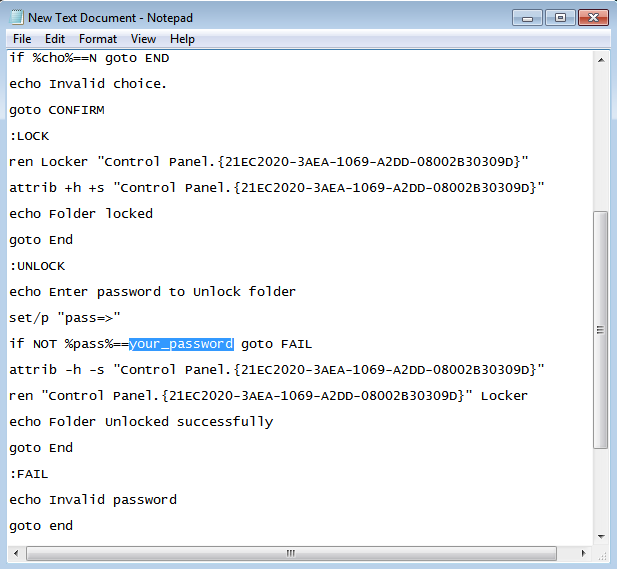
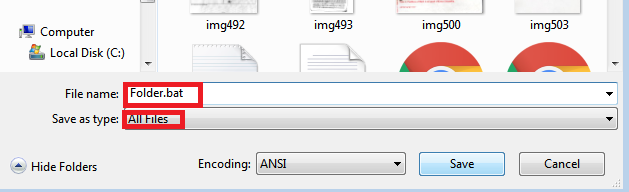
Then look for ‘your_password’ and replace it with the password you want to use to lock your folder. Then go to Save As. Select the Save As Type: All Files and File Name: Folder.bat Save the document.
We have basically created a batch file inside the folder we want to put a password on. Double clicking on the .bat file will create a folder inside the original folder. Drag all the filed into this new folder created.
Double click the .bat file again. You’ll see a command prompt Window asking you whether you want to lock the folder with the password you replaced ‘your_password’ with. press Y on your keyboard and press Enter.
Now every time you try to open the folder, you’ll be required to provide your password through a command prompt Window. Simply Enter the password and press Enter on your keyboard.
To remove the password, open the .bat file and Enter your password. The folder will then be open.
NB: This is definitely an extra point of consideration if you’re still thinking about the Windows 10 upgrade.