You already know how to Embed a YouTube video in your blog or website. It’s the safest way of having someone else’s content on your website. Any public video can be embedded unless the owner has disabled embedding.
The problem with embedding is that sometimes you are only interested in a section of a YouTube video rather than the whole video. You only want your website/blog audience to see a fraction of a YouTube video.
The default embed code does not allow you to choose what part of a YouTube video to embed. It will embed the entire video onto your website. If you are only interested in 5 minutes out of a 40 minute long video, you’ll have to embed the entire video. Most of the time, the website/blog audience will not watch the video.
However, there is a workaround that makes this embedding business more practical. Using the YouTube Javascript API, you can embed only the section of a YouTube video you are interested in showing to your blog/website audience.
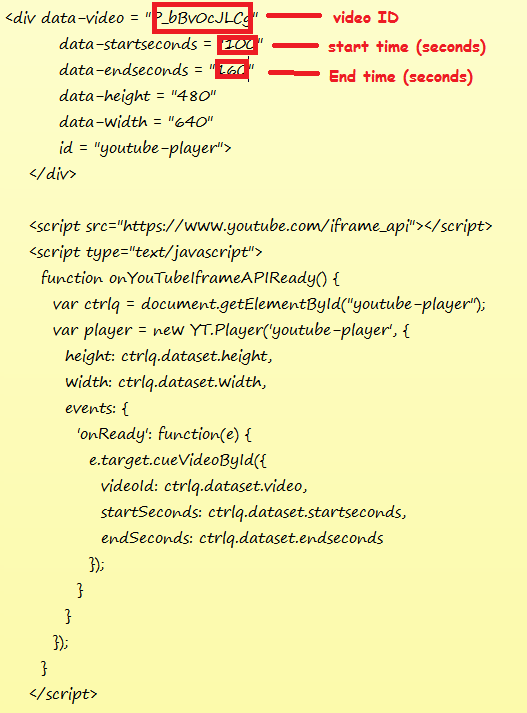
The code below is from the YouTube javascript API and it’s the embed code you will use if you want to embed only a section of a YouTube video.

The first thing you need to get is the video ID of the video you want to embed. Enter it in the Video ID section in the code. Then find out the start and end time of the video section you want to embed. Convert that time into seconds and enter it into the code. Make sure the video ID, start time and end time are in between the double speech marks.
Here is an example of the video I have embedded with start and end times. You will notice that when you press play, the video will not start from the start neither will it play to the end.
Copy and paste the new YouTube embed code below so that you can easily copy it to your website. Remember to replace the video ID, start time and end time before you publish the embed code.
<div data-video = “P_bBv0cJLCg”
data-startseconds = “100”
data-endseconds = “200”
data-height = “480”
data-width = “640”
id = “youtube-player”>
</div>
<script src=”https://www.youtube.com/iframe_api”></script>
<script type=”text/javascript”>
function onYouTubeIframeAPIReady() {
var ctrlq = document.getElementById(“youtube-player”);
var player = new YT.Player(‘youtube-player’, {
height: ctrlq.dataset.height,
width: ctrlq.dataset.width,
events: {
‘onReady’: function(e) {
e.target.cueVideoById({
videoId: ctrlq.dataset.video,
startSeconds: ctrlq.dataset.startseconds,
endSeconds: ctrlq.dataset.endseconds
});
}
}
});
}
</script>

