In this guide, we’ll walk you through the step-by-step process to back up your Google Pixel 8 & Pixel 8 Pro. The Google Pixel 8 and Pixel 8 Pro are powerhouse smartphones, known for their cutting-edge features and impressive camera capabilities.
To safeguard your valuable data and ensure a seamless transition in case of unexpected events or when upgrading to a new device, it’s crucial to have a robust backup system in place.
Before we delve into the process, let’s understand why backing up your device is so crucial. In the digital age, our smartphones are repositories of cherished memories, important documents, and irreplaceable information. From photos and videos to contacts and app data, losing these files can be a devastating experience. A regular backup ensures that even in the worst-case scenario, your data remains safe and accessible.
Watch: How To Turn Live Captions ON / OFF On Samsung Galaxy Tab S9, S9+ and S9 Ultra
Back Up Google Pixel 8 & Pixel 8 Pro
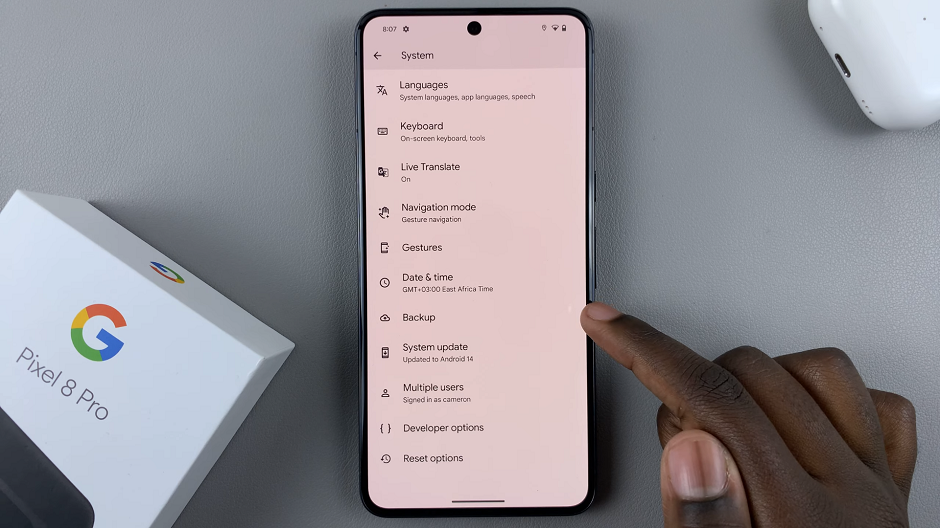
Navigate to the Settings app on your Pixel 8 or Pixel 8 Pro. Scroll down and select System.
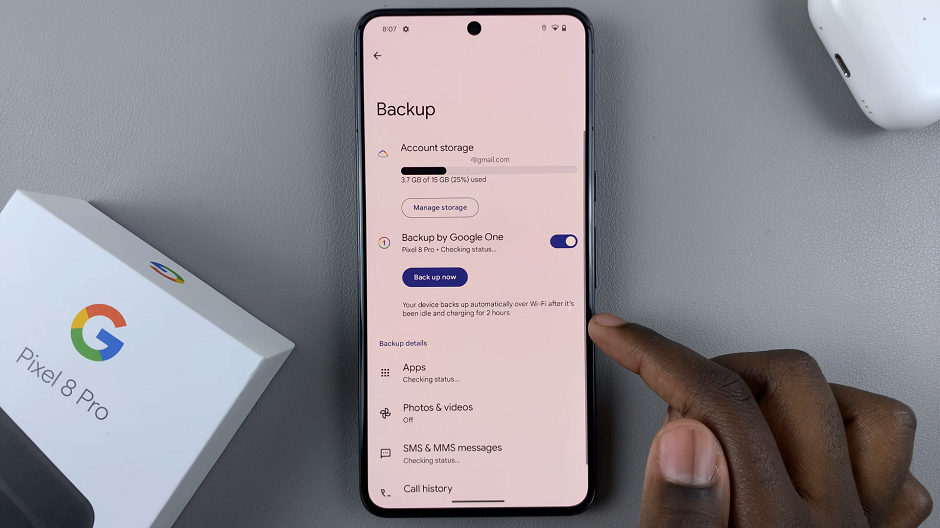
Tap Backup and then make sure the toggle for Backup by Google One is enabled. This ensures that your data backs up automatically over Wi-Fi if it is charging or remains idle for 2 hours.
Make sure the backups for Apps, Photos & Videos, SMS & MMS Messages, Call History, Device Settings and Google Account Data are enabled or disabled. This is of course based on your own personal preference.
You can also toggle the switch for Backup Using Mobile data or Metered Wi-Fi Data on or off, depending on what you prefer. Although, for this, data charges may apply significantly.
Once you customize all these options, tap on Backup Now. You will be prompted to enter your screen lock PIN, since a face or fingerprint unlock cannot be used.
Once you verify yourself with the PIN, the device will back up your app data, call history, contacts, device settings, photos, and videos to your Google One account. This will a varying amount of time, depending on whether you have a stable wi-Fi connection and how big your back up is.
Restore Data on a New Device
When setting up a new device, simply sign in with the same Google account you used to back up your Pixel 8 or Pixel 8 Pro. During the setup process, you’ll be prompted to restore from a previous backup. Follow the on-screen instructions to restore your apps, settings, and data.
By following these steps, you can ensure that your device remains a secure repository of your digital life. Regular backups provide peace of mind, knowing that your data is safe and accessible, no matter what the future holds.

