Waking up to the sound of an alarm is a daily routine for many of us, but what about those alarms we set and forget? Android phones provide convenient ways to set alarms, but sometimes managing or deleting them can be a bit tricky.
Whether it’s eliminating a redundant alarm or clearing out past reminders, knowing how to delete alarms on your Android device can be incredibly useful.
Here’s a comprehensive guide to help you efficiently manage and remove alarms from your Android phone.
Read: How To Remove (Delete) System PIN On Hisense VIDAA Smart TV
Delete Alarm On Android Phone
The Clock app on Android devices is where all the alarms are managed. Finding this app might differ slightly depending on the device’s manufacturer or the version of Android you’re using.
You will need to open the Clock app. Do this by tapping the clock icon on your home screen or by selecting the Clock app from the app drawer. You can also search for the app using the search function.
Once you have opened the Clock app, you will see several tabs at the bottom of the screen, including Alarms, World clock, Stopwatch, Timer, and Bedtime. To delete an alarm, you will need to go to the Alarms tab.
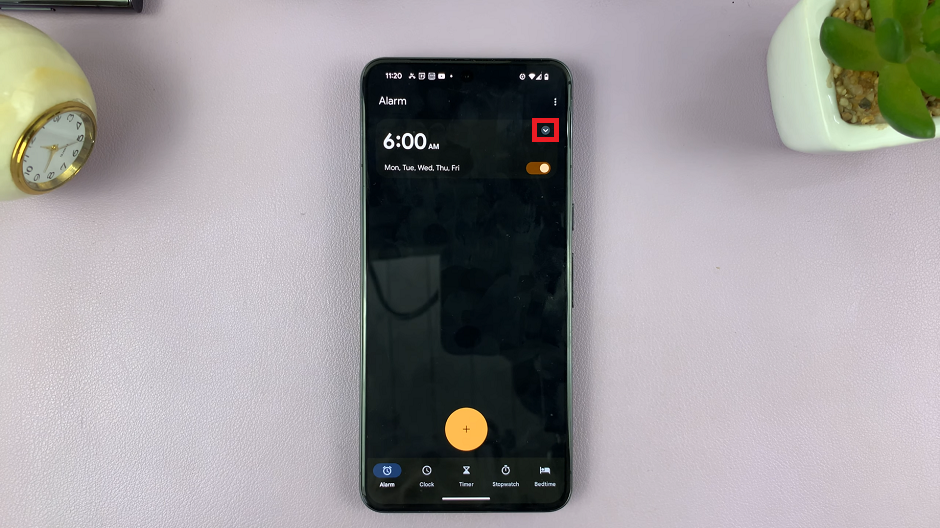
On the Alarms tab, you will see a list of all the alarms you have set up on your Android phone. Find the alarm you want to delete and tap and hold on it to open its settings. On stock Android, simply tap the drop-down arrow next to the alarm you want to delete to open its settings.
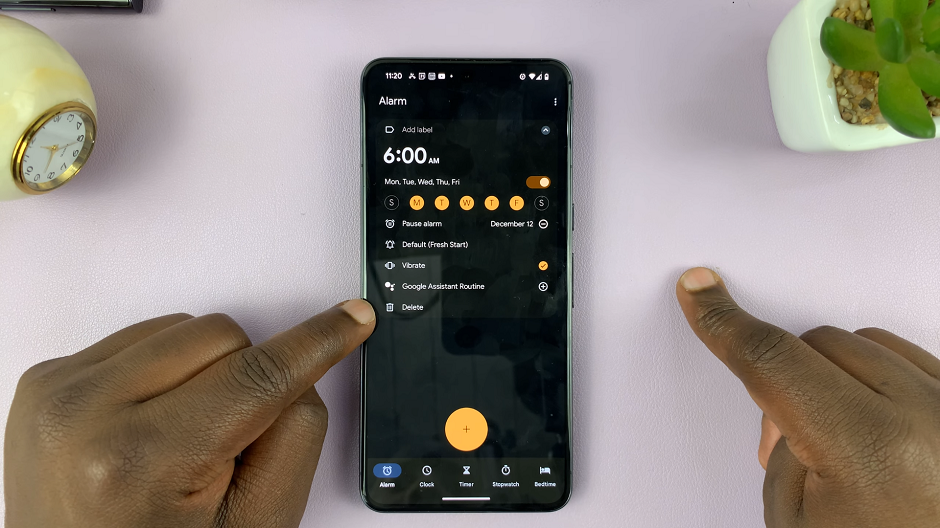
Once you have opened the settings for the alarm you want to delete, simply tap the Delete button. Repeat this process for all the alarms you want to delete.
Tips for Efficient Alarm Management
Label Your Alarms: To differentiate between various alarms easily, consider labeling them. You can give each alarm a specific name, making it simpler to identify and manage them.
Regular Review: Periodically review your alarms. Remove any that are no longer needed or relevant to your schedule.
Utilize Built-in Features: Some Android devices offer additional functionalities for alarms, such as setting recurring alarms, adjusting alarm tones, or customizing snooze settings. Explore these features to make the most of your alarm management.
Mastering the art of deleting alarms on your Android phone not only helps declutter your Clock app but also ensures you’re waking up to the alarms that truly matter. With just a few simple steps, you can efficiently manage your alarms, removing unnecessary reminders and streamlining your daily routine.
Take control of your alarms today by following these steps and make your mornings more organized and stress-free!
Watch: Hisense VIDAA Smart TV: How To Set Airplay PIN To ‘Every Time’

