WebPro Education

Tech tips everyday
Menu
  • REVIEWS
  • HOW TO
  • TECH NEWS
  • About Us
Home
how to
How To Enable & Customize Keyboard Shortcuts On Gmail
how to

How To Enable & Customize Keyboard Shortcuts On Gmail

David Frank September 4, 2024

Keyboard shortcuts like Ctrl + K, etc can save you a lot of time when using Gmail. You can carry out multiple tasks quickly by simply using key combinations to browse your inbox and take a peek at the last mail you received.

If you’re a heavy email user with an inbox that fills up throughout the day, hitting all of those keys at once can speed through some tasks. Gmail comes with many predefined shortcuts. Nevertheless, these shortcuts are off by default which means first of all we will have to enable them.

Once enabled, you can customize them to suit your preferences. With this guide, you will learn how to enable & customize keyboard shortcuts in Gmail.

Watch: How To Delete Profiles In Google Chrome

Enable & Customize Keyboard Shortcuts On Gmail

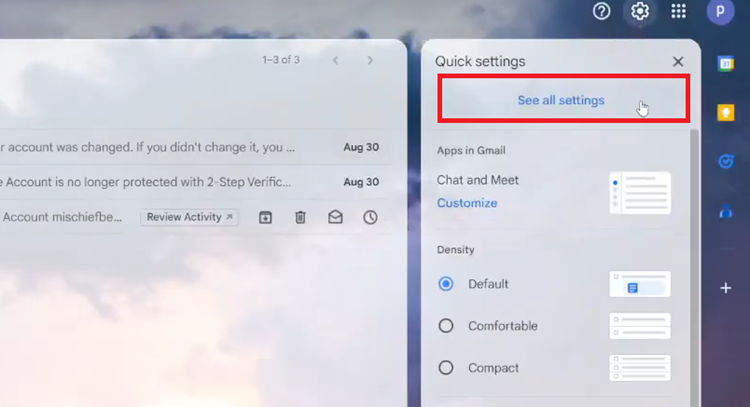
To begin, launch your favorite browser. From here, access your Gmail account, then log in to your Google account when prompted. Then, tap on the “Settings” icon at the upper right corner of the screen and select “See All Settings.”
How To Enable & Customize Keyboard Shortcuts On Gmail

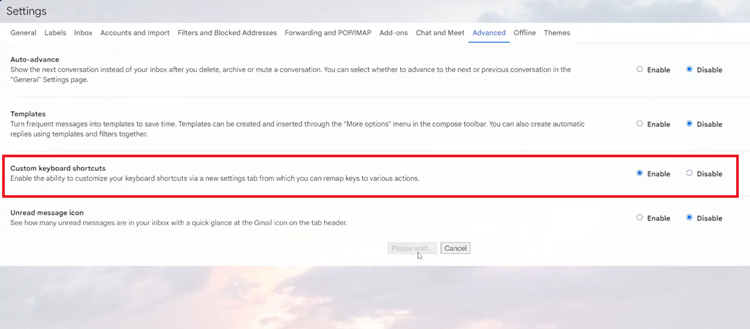
Following this, select the “Advanced” tab and find the “Custom Keyboard Shortcuts” section. Then, find the “Enable” and click on it to turn on keyboard shortcuts. Tap on “Save Changes” and you’ll apply the changes.
How To Enable & Customize Keyboard Shortcuts On Gmail

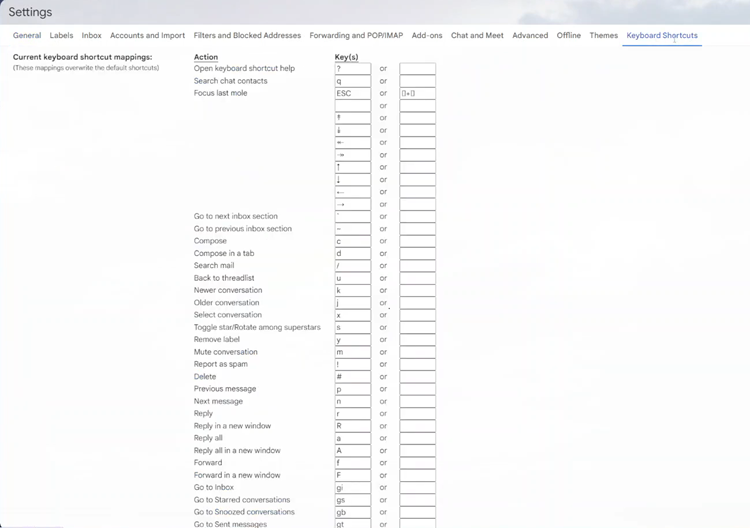
Once enabled, head back to See All Settings and find the “Keyboard Shortcuts” tab. Click on it to proceed and you’ll see all the keyboard shortcuts. Here, select the shortcut you’d like and change the keyboard shortcuts you’d like.
How To Enable & Customize Keyboard Shortcuts On Gmail

By enabling and customizing keyboard shortcuts, you can significantly speed up your Gmail experience and tailor it to your workflow preferences.
Read: How To See Hidden Apps On iPad

Share
Tweet
Linkedin
Reddit
Tumblr
Stumble
Whatsapp
Telegram
Email
Prev Article
Next Article

Related Articles

How To Protect Battery By Limiting Max Charge To 85% On Samsung Galaxy A05s

How To Protect Battery By Limiting Max Charge To 85% On Samsung Galaxy A05s

How To Set Up eSIM On iPhone 15 & iPhone 15 Pro

How To Set Up eSIM On iPhone 15 & iPhone 15 Pro

  • How To Turn OFF Talk Back On Samsung Galaxy Watch 8 / 8 Classic
  • How To Automatically Check Stress Levels On Samsung Galaxy Watch 8 Classic
  • How To Disable Incoming Calls On Your Samsung Galaxy Watch 8 Classic
  • How To Screen Record On Galaxy A07
  • How To Take Screenshot On Galaxy A07
DMCA.com Protection Status

Associates Disclosure

WebPro Education is a participant in the Amazon Services LLC Associates Program, an affiliate advertising program designed to provide a means for sites to earn advertising fees by advertising and linking to amazon.com.

WebPro Education

Tech tips everyday
Copyright © 2025 WebPro Education

Ad Blocker Detected

Our website is made possible by displaying online advertisements to our visitors. Please consider supporting us by disabling your ad blocker.

Refresh