We all know what has been happening in 2020. The pandemic, yes, but it’s also the DIY year too.
A lot of people have chosen to create everyday stuff for themselves instead of buying them.
So guess what, we are going to learn how to make a stylus ourselves too. Now let us get down to it.
One will be made using a Cotton bud or Q-tip and the other using Cotton wool.
We are also going to need a Biro or ball point pen that you can take the ink cartridge off of, tin or aluminium foil, tape and of course the cotton bud, Q-tip or cotton wool.
How To Make A Homemade Stylus
Using A Cotton Bud Or Q-Tip
First, remove the ink cartridge from your pen and then cut your cotton bud diagonally, 100 mm from the end of the bud.
Next up, insert the cut cotton bud into the hole where the nib of the pen sits. Now screw the pen back and wrap the tin or aluminium foil all around the pen.
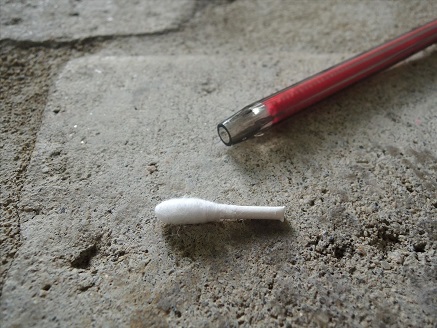
Ensure that the foil is in contact with the cotton bud. Use the tape you have to ensure the foil does not come off.
Finally, dampen the cotton bud tip with some water to the point of being damp but not soggy. This is so that the pen becomes conductive.
There you go, you have a Stylus. If the tip becomes dry, just dampen it once again.
Using Cotton Wool
This method works best with a metal-cased pen or one with a metal tip.
To begin with, take your pen apart and in the case of a metal tipped one, cover it with foil and secure it using tape.
Now, take a small piece of cotton wool and insert it into the nib hole of the pen.
Ensuring you are using just the right amount of cotton wool, now push the ink cartridge into the tip of the pen to secure the cotton wool.
Put back the pen by screwing its top back and the bottom too. Shape the cotton wool to look like the tip of a pen using scissors and dampen it a bit using water. Your Stylus is now ready for use.